

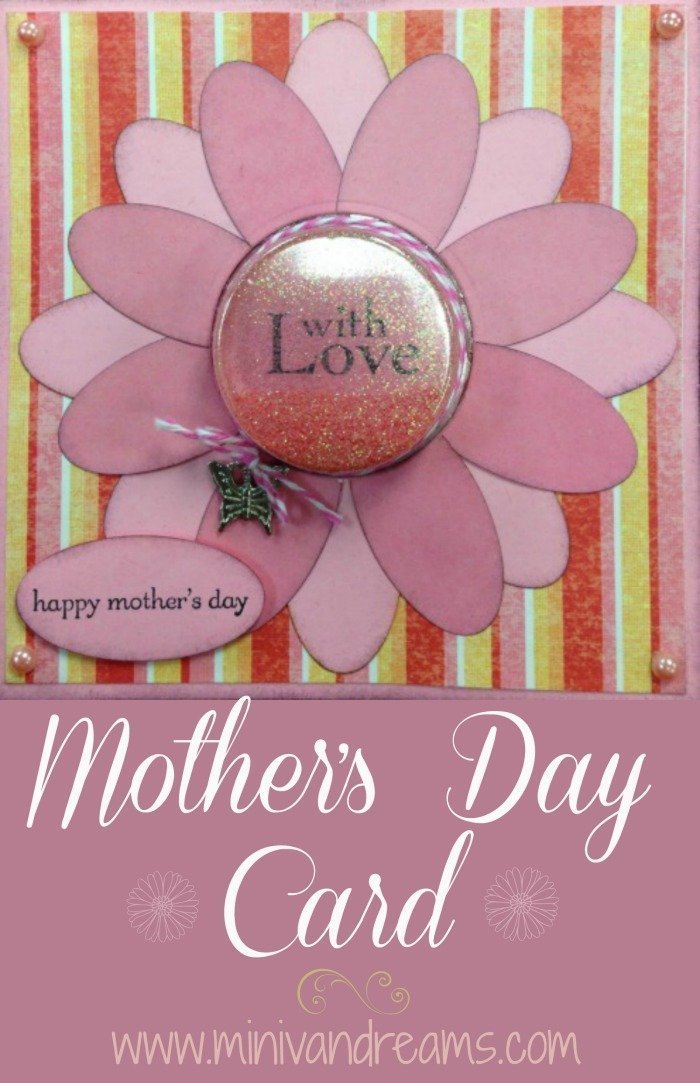
Mother’s Day Card
The Mother’s Day Card I am sharing today takes a little longer than most of the card tutorials I post, but as you can see – it is completely worth it for this super-cute card. As with all of my cards, feel free to make it your own with different papers, colors, and sentiments. This would be adorable as a birthday card for just because card, as well.
Supplies:
- 5″ x 10″ pink card stock
- 2 – 4.75″ x 4.75″ striped papers
- Treat cup
- 4 self-adhesive pink pearls
- Small scrap acetate or plastic sheet**
- Brown ink pad
- Sponge, optional (for distressing edges)
- Pink baker’s twine
- Pink glitter
- Butterfly charm
- “With Love” stamp
- “Happy Mother’s Day” stamp
- Large oval punch
- Circle die cut to fit treat cup (or craft knife and mat)
- Pink card stock
- Dark pink card stock
- Adhesive
- 2 pop dots
- Paper cutter
- Scissors
Directions:
- Fold 5″ x 10″ pink card stock in half. Crease well.
- Distress all four sides of folded card with brown ink.
- Distress all four sides of both striped sheets with brown ink.
- Adhere striped sheets to the outside of the card, both front and back.
- With the oval punch, cut 9 pink ovals and 8 dark pink ovals from card stock.
- Distress all the ovals with brown ink.
- Stamp “Happy Mother’s Day” on one pink oval and set aside.
- Arrange the other ovals, as shown, to create a flower pattern on the front of the card.
- Determine where you want your treat cup to go, use your die cut machine to cut the corresponding hole to fit the cup (or, use a craft knife and mat to cut the hole)
- With the hole cut, carefully stamp your sentiment on the inside of the card, so it will show through the clear treat cup.
- Turn the treat cup upside down and fill with about a teaspoon or so of glitter.
- Using your scissors, carefully cut a circle to cover the opening of the treat cup to contain the glitter. Adhere this circle to the back of the treat cup.
- Open the card up, adhere the treat cup to the card, so the cup is on the outside. (Treat cups are usually self-adhesive, if not, apply plenty of adhesive.
- Wrap the bakers twine around the treat cup twice and tie a knot.
- Thread the butterfly charm on the end of the baker’s twine, tie a second knot, then a bow. Trim the ends as needed.
- Using pop dots, adhere the oval with “Happy Mother’s Day” to the front of the card as shown.
- Apply four pink pearls to each corner.
Want a printable supplies and instruction sheet? Click here.
**A plastic page protector works great, if you do not have acetate for scrapbooking. In a pinch, a strong storage bag can be used as well.
[php snippet=5]
4 Comments
Ritchil Shafer (Cheng and 3 Kids)
May 12, 2014 at 5:43 pm
This card is very pretty! I especially love the treat cup with the glitter. So clever!
Barb
May 12, 2014 at 9:55 pm
Ok, that baker’s twine, is just so cute! I think it is my fav feature on your adorable card. Sure hope your twins made you an adorable card just for you. I am a bit of a card/letter junkie so to see you making cards warms the heart….and pen. Visiting you via ‘SmallVictoriesSunday” linkup.
Betsy @ BPhotoArt
May 14, 2014 at 12:39 am
Great tutorial. This is really pretty, looks like it was worth the extra effort. Thanks for sharing at #smallvictoriessundaylinky !
Tanya @ Mom’s Small Victories
May 15, 2014 at 10:58 pm
So lovely. thanks for sharing with Small Victories Sunday linky. You’re inspiring me to want to get back to making cards with all that scrapbook paper I have!